Using this small windows tweak, you can instantly Click and Print content lists of any folder in Windows 7 or Vista. How To Print An Automatically Generated Directory List
- Click the Windows Start Menu Orb and Type notepad into the Start Menu. Next Press Enter on your keyboard or Click the Notepad programs link.
2. Copy and Paste the following code into the blank Notepad: @echo off dir %1 /-p /o:gn > “%temp%Listing” start /w notepad /p “%temp%Listing” del “%temp%Listing” exit
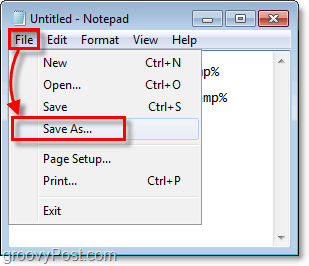
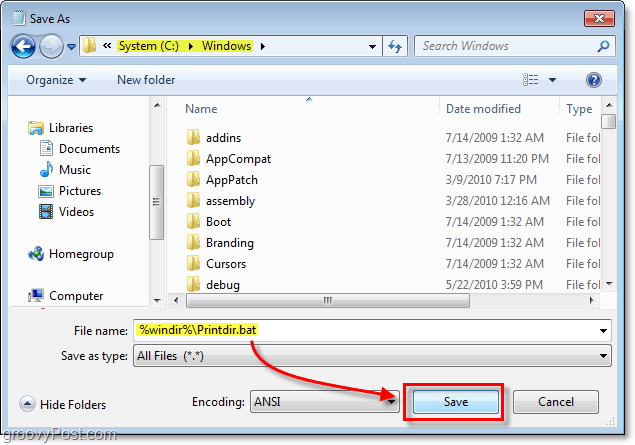
3. Click the File menu and Select Save As
4. In the File Name text box Paste the following: %windir%Printdir.bat Then Click Save.* *This typically will save the file to the location C:Windows with the name Printdir.bat
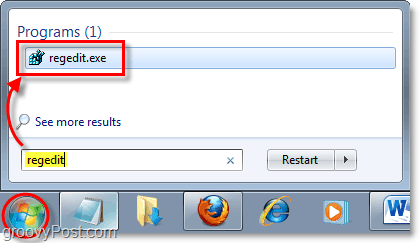
Now it’s time to create the registry key, so the command appears in the right-click context menu. If you want to skip the rest of these steps, you can Download the pre-made registry fix from the link at the bottom of this article. 5. Click the Windows Start Menu Orb, Type regedit in the search box, and then Press Enter.
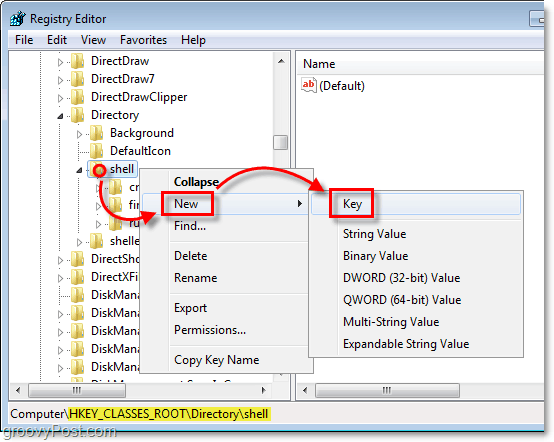
6. Navigate through the left pane of the registry to the following key: HKEY_CLASSES_ROOTDirectoryshell Once there, Right-Click the shell key (looks like a folder) and then Select New > Key.
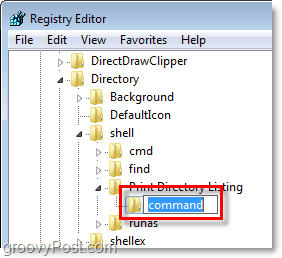
7. The new key should appear underneath shell. Rename the new key to Print Directory Listing.
The next two steps might feel a little repetitive, but the Windows registry is a pretty boring place. 8. Right-Click Print Directory Listing and Select New > Key.
9. The new key should show up under Print Directory Listing. Rename the new key to command.
Here we break the cycle and edit the default file that usually never gets touched. 10. Under the command key that you just created, Right-Click the default entry and Select Modify.* *You can also just Double-Click the (Default) entry to modify it.
11. Type the following into the Value data box: Printdir.bat %1 Once done, Click OK.
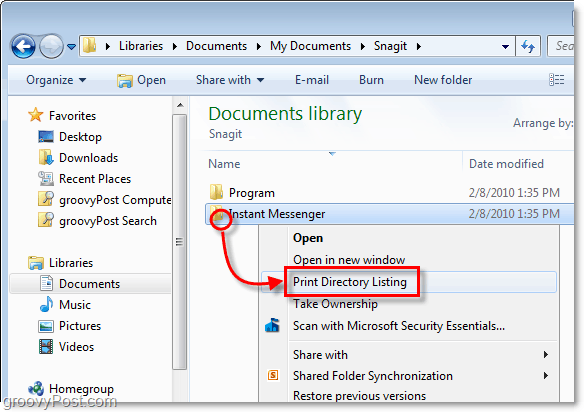
Done! Now here is the result. Now when you Right-Click nearly any folder there will be a new option in the menu called Print Directory Listing. Take a note that this button is linked right to your default Windows Printer.
When you Click the Print Directory Listing option, it will send an automatically generated text list of the folders contents straight to the default printer.
Download the Print Directory Listing registry fix type “%temp%Listing” | clip Which this will type the contents of the listing file and put it into the clipboard so I do not have go to the notepad for select all and copy. Here is my recommend change. @echo off dir %1 /-p /o:gn > “%temp%Listing” type “%temp%Listing” | clip start /w notepad /p “%temp%Listing” del “%temp%Listing” exit Z:\My Music!I’m A Man – variety – Application not found Comment Name * Email *
Δ Save my name and email and send me emails as new comments are made to this post.


![]()
